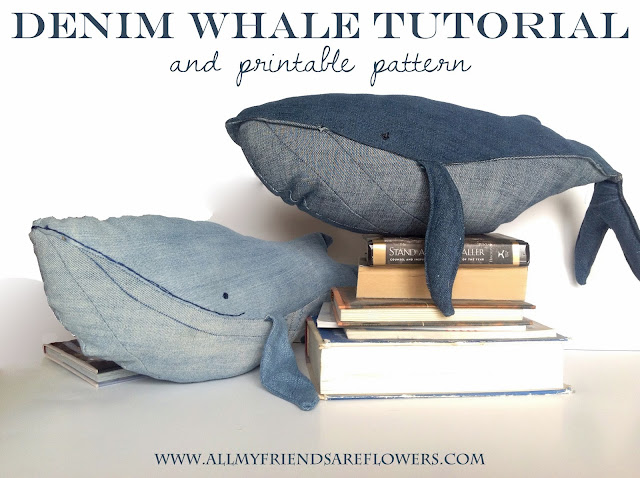
I don't claim to be a seamstress, in fact my sewing skills are novice at best. But when I stumbled upon a denim whale on Pinterest the other day I couldn't help but make a denim whale for my baby girls nursery.
The inspiration came from a whale I pinned off of this Finnish blog. The pictures were great, but she didn't give a pattern. In fact she noted in her post that she draws her own pattern right on the fabric. That wasn't going to work for me. I love to draw, but I also love to erase and redraw until I've got something just the way I like it. The idea of erasing on denim didn't really appeal to me.
So I drew my pattern out on notebook paper {which you can see pictured in my tutorial} and made a few changes. I wanted my whale to be a little more friendly, so a gave him some cartoon-ish features and made his lest anatomically correct.
The pattern isn't perfect, not by a long shot. But I've used it to make two whales so far and it's worked great for me. The following tutorial is of the second whale I made, the dark blue guy pictured above. I did a few variations at my little brother's request and I ended up loving the changes.
My second whale has topstitched fins that we filled with fluff. The first whale has floppy fins and tail, which I think suits him just fine. Also, on the second go around I topstitched where the belly attaches to the top of the body. This gave him a very distinguished, whale-like upper lip which I liked better than the embroidered smile I gave the light blue whale.
Remember, my pattern is free. Feel free to use it to make whales for yourself, to give away, or go ahead and use it to make whales to sell. However, please do not claim the pattern itself as your own or sell it in any way. Also, if you repost this idea on your own blog please link it back to my blog and the original pattern. Enjoy!
The All My Friends are Flowers Denim Whale Tutorial
First, download the pattern HERE.
It's five separate PNG files that should print on standard 8" x 11.5" printer paper. Because it's printer friendly some taping of the pieces is required. Instructions are given on each sheet describing how they should be put together.
Next, find an old pair of jeans that you don't mind cutting apart. I'm a little sentimental about jeans. My favorite pair bit the dust this summer when the butt tore wide open on a hike where I was chaperoning a bunch of my high school students. Yeah, it was bad. They'd been sitting in my drawer since August because I couldn't bear to part with them. Well now I don't have to! They were washed and turned into a stuffed animal for my soon-to-be-born baby girl.
But I digress, once you've found your pair of jeans, lay the pattern out then trace and cut. Since the belly and top half of the whale are fairly large I split my pants down the crotch seam and opened the legs up wide so I could make sure I had enough fabric for what I wanted. Here you can see my original hand drawn patterns on notebook paper.
Once you've got the required number of pieces cut out {2 belly pieces, 2 top pieces, 2 tail pieces, and 4 flippers} match them up and pin them with the right sides together.
*note* I wanted the belly to be the lighter color of the inside of the jeans so I pinned that piece with the right sides on the outside.
For all those non-sewers out there {like me} the "right side" is the dark blue outside of the jeans. Once you sew them and flip them inside out you'll end up with the right side showing for the top body, fins, and tail.
After you've pinned the pieces to make sure they stay where they're supposed to, sew the fins and the tail. Make sure to leave the end that will be attached to the body open so you can turn it inside out.
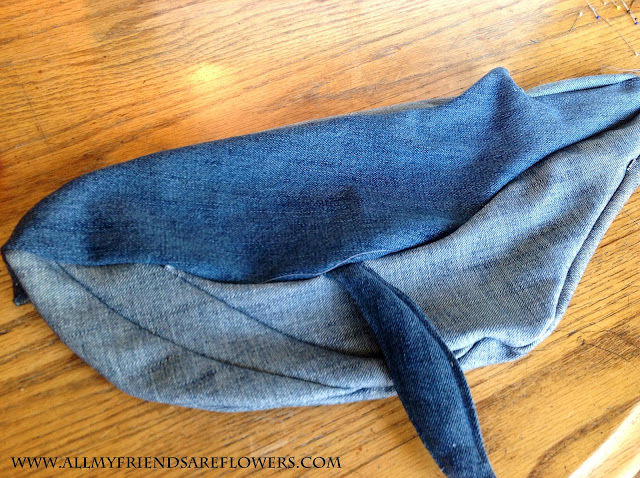
Once I flipped my fins and tail inside out I top-stitched around my fins. I didn't top stich my first whale and just tried it on a whim for the second. The top stitching ended up looking great so I'd recommend it. You can see the nice effect the top-stitching gives the fins in the picture below.
The light blue whale doesn't have stuffing in his fins, I wanted his to be floppy like those in the pictures I saw on the Finnish blog. But my second whale ended up with stuffed fins. Its just personal preference, I like them either way.
Next, start sewing the main body. For the top, attach the two pieces together from the lips, back, top fin to the ends. For the bottom just sew from l lips to tail. Make sure that on both the top and bottom pieces you're leaving the end open so that once the top and bottom are sewn together there's still room to add stuffing and attach the tail.
Here's my guy with the top and belly sewn, waiting for fins to be attached before both pieces go together.
Next, before sewing the top and bottom together I sewed some decorative pleats on the belly. Using pins, I pinched very small sections together on the right {or darker blue} side of my fabric. These lines curved with the body and ended up meeting with the main belly seam.
This picture shows the pinned decorative seams and the reverse side that will eventually be the visible part of his belly. I did two decorative pleats on each side.
Once the belly pleats are completed the top and bottom pieces are pinned together and sewn. Don't forget to add your fin. I sewed each side separately so that I could make sure the fin placement was ok. I'm sure you could pin the entire thing and sew it at the same time but I did it in two different steps. I started each piece at the lips and went all the way down to the tail.
After I sewed on the first fin I flipped the whale so I was looking straight down at his back. This helped me pin the other fin in the right place.
After sewing both pieces together I flipped him inside out {this is why we leave that hole where the tail will go}. On a whim I decided to top-stich where the body sections came together. This gave my whale really great looking lips.
Last, I stuffed him really good and full and sewed his tail on the back with a straight stitch.
There you have it. Pretty simple huh? Please feel free to leave comments, I'd love to see pictures of any whales made with my pattern. Also, let me know if you have any questions.


Love it !!!!! Thank you so much for the great tutorial :)
ReplyDeletedefinetly going to try this
Love tina
It is fabulous! Love how you used the wrong and right sides of the denim!
ReplyDeleteEsther
esthersipatchandquilt at yahoo com
ipatchandquilt dot wordpress dot com
God bless you for sharing this and making yours clearer than the original blog. Will make one for my nephew's upcoming 5th birthday. Wish me luck :)
ReplyDeletexoxo